If you are like most homeowners, you don’t think about your chimney until you have a problem. Because chimneys project above the roof line, they are exposed to more severe weather than any other part of your home. Spending a little time to protect your chimney now may save you thousands of dollars down the road after more serious damage occurs.
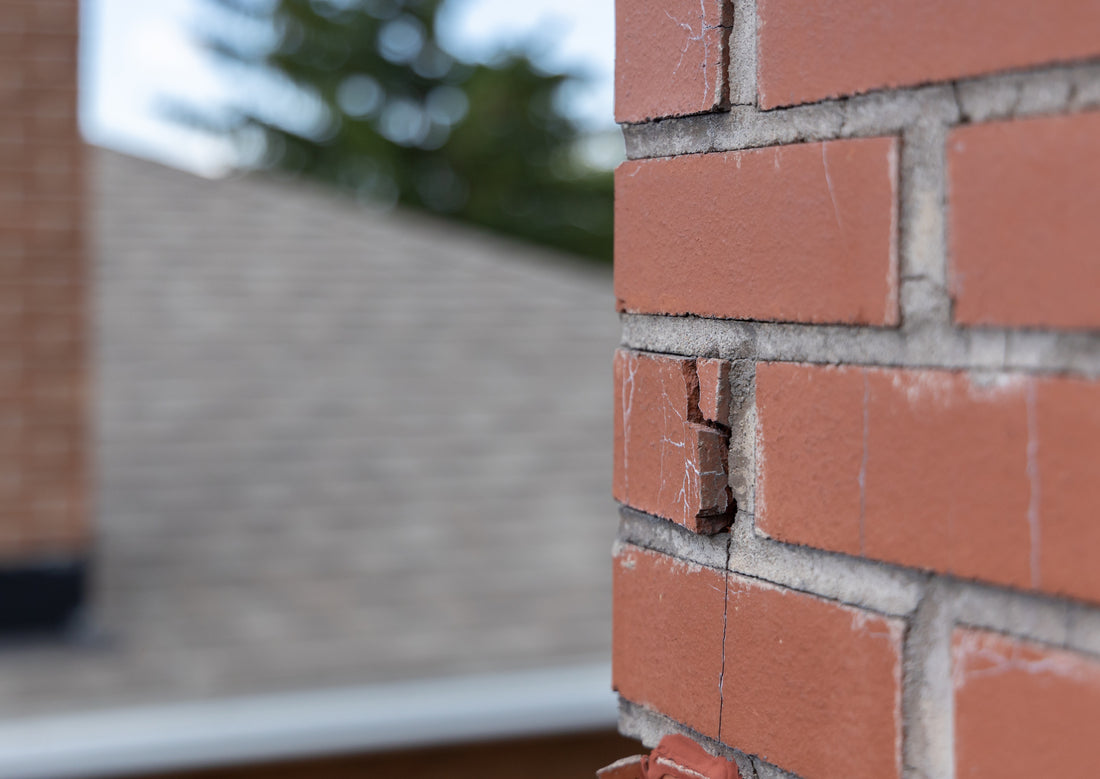
Chimneys take a beating from severe weather year round. Water penetration is the single greatest cause of deterioration and damage. Waterproofing your chimney is a simple and easy task that will extend the life of your chimney for years and will protect against expensive repairs. Chimney leaks are a frustrating problem for many homeowners; waterproofing your chimney is the best way to solve chimney leaking problems. While there are several potential sources for water intrusion on a chimney, the brick and mortar joints are usually the most obvious places to start.
<em>Note: Before you start, make sure that the pitch of your roof isn’t too steep and that you are comfortable climbing up on your roof. Make sure to use some type of fall protection to prevent serious injury. If you’re not comfortable with this, it might be a good idea to hire a professional chimney sweep. You can search for a qualified sweep in your area by going to <a href="http://csia.org" target="_blank" rel="noopener">www.csia.org</a>.</em>
<h2>Step 1 – Measure the Surface Area of Your Chimney</h2>
The first step to waterproofing your chimney is to determine how much material is needed. Measure all the sides of your chimney to determine the total area. Calculate the area of each side of your chimney, then add all four sides together to come up with the total area.
<h2>Step 2 – Clean the chimney<img class="size-medium wp-image-1321 alignleft" src="http://chimneyrx.com/wp-content/uploads/2016/12/chimneyrx-safer-masonry-cleaner-1gal-1-300x300.jpg" alt="chimneyrx-safer-masonry-cleaner-1gal" width="300" height="300" /></h2>
If the chimney has any mold, dirt, rust, creosote stains, efflorescence, or any other foreign matter, you will want to remove it first. Use <a title="Chimney Rx Safer Brick & Masonry Cleaner" href="http://chimneyrx.com/safer-brick-masonry-cleaner/">ChimneyRx Safer Brick & Masonry Cleaner</a> to thoroughly clean the surface of the chimney. You can mix it four parts water to one part cleaner and apply it with a pump-up garden sprayer.
One concentrated gallon makes five gallons of diluted cleaner and will cover up to 625 sq. ft. If necessary, scrub any tough areas with a stiff bristle brush and then rinse thoroughly with a hose. A power washer can be substituted for scrubbing if desired. Once cleaned, allow the chimney to dry out for 24-48 hours.
<h2>Step 3 – Protect Non-Target Areas</h2>
Over-spray on shingles can cause discoloration; use an absorbent material around the base of the chimney. Don’t use plastic drop cloths — the material can become slippery and the over-spray can run off onto the roof. The slick surface is a slip hazard if you step on it while on the roof.
If there are any windows or siding within range of over-spray, protect them as well. Over-spray on these areas can easily be wiped off while still wet, but once the water repellent is allowed to dry, it becomes nearly impossible to remove.
<h2>Step 4 – Minor Repairs</h2>
If the chimney has minor cracks, repair these before you waterproof it. <a title="Chimney Rx Masonry Crack & Joint Sealant" href="http://chimneyrx.com/masonry-crack-joint-sealant/">ChimneyRx Crack & Joint Sealant</a> is a great product for repairing minor cracks up to 1/8″ wide on mortar joints. It’s kind of like paintable caulk that dries to a translucent, milky-white color. You won’t notice it on the light gray mortar joints, but try to keep it off the bricks as it can become more noticeable over time. One pint of Crack & Joint Sealant is enough to treat the mortar joints surrounding approximately 137 bricks.
If the chimney has more severe damage that requires tuckpointing or rebuilding, you may consider hiring a pro. Tuck pointing, brick replacement, and chimney rebuilding are beyond the scope of this article.
If your chimney has recently been tuck pointed, allow three or four days for the mortar to cure before applying a water repellent. If major areas of the chimney have been totally rebuilt, allow a full 28 days for the new masonry to cure before applying a water repellent. Applying a water repellent on masonry that has not cured will result in a shortened lifespan as the water repellent won’t bond properly.
<h2>Step 5 – Choose a Breathable Water Repellent</h2>
When treating chimneys, it’s very important not to use a sealer. As chimneys heat up and cool down, moisture is created inside the chimney; this moisture normally escapes through the brick and mortar joints, but if a sealer is used, the moisture will remain trapped, and this trapped moisture will freeze and then thaw as it warms up. As it expands and contracts, it will cause the faces of the bricks to pop off (called spalling). Once this happens, you will have to have the bricks replaced or have the chimney rebuilt if enough of the bricks are spalling. Treating your chimney with a breathable water repellent will prevent this problem.
<h2>Step 6 – Apply the Water Repellent</h2>
Once your drop cloths are in place, apply the water repellent using a pump-up garden sprayer with a fan type nozzle. One gallon of <a title="Chimney Rx Masonry Chimney Water Repellent" href="http://chimneyrx.com/masonry-chimney-water-repellent/">Masonry Chimney Water Repellent</a> covers about 100 sq. ft. (for two coats). Use your area calculation from step one to determine how much water repellent material you’ll need.
Start at the bottom of the chimney and gradually work your way to the top. <img class="alignright wp-image-136 size-full" src="http://chimneyrx.com/wp-content/uploads/2013/02/applying-water-repellent.jpg" alt="applying-water-repellent" width="282" height="185" /> Apply a flood coat by spraying it on heavily enough so that it runs down about 6″-8″ from where you’re spraying. Move side to side, gradually moving towards the top of the chimney.
Applying a flood coat will cause the surface to become totally saturated and allow as much water repellent to soak in as possible. Keep a soft bristle brush handy; agitating the wet surface with this brush will help ensure even distribution and break the surface tension to allow even more of the water repellent to absorb. The deeper the absorption, the longer the waterproofing job will last.
For optimum performance, apply a second wet-on-wet coat within three to five minutes. The water repellent will take about two to six hours to dry. Make sure there’s going to be at least a six hour window of dry weather before waterproofing your chimney.
<em>Note: Over applying the water repellent can result in a slight darkening of the surface.</em>
<h2>Step 7 – Cleanup</h2>
Once you’ve waterproofed your chimney, it’s time to clean up. Carefully remove the drop cloths and any supplies you have on the roof top. It’s a good idea to have a second helper to hand things to down on the ground. Clean out your sprayer and brush with soap and water, and then you’re done.